Workspace Generators
Workspace generators provide a way to automate many tasks you regularly perform as part of your development workflow. Whether it is scaffolding out components, features, or ensuring libraries are generated and structured in a certain way, generators help you standardize these tasks in a consistent, and predictable manner. Nx provides tooling around creating, and running custom generators from within your workspace. This guide shows you how to create, run, and customize workspace generators within your Nx workspace.
Creating a workspace generator
Use the Nx CLI to generate the initial files needed for your workspace generator.
1nx generate @nrwl/workspace:workspace-generator my-generatorAfter the command is finished, the workspace generator is created under the tools/generators folder.
happynrwl/
├── apps/
├── libs/
├── tools/
│   ├── generators
│   |   └── my-generator/
│   |   |    ├── index.ts
│   |   |    └── schema.json
├── nx.json
├── package.json
└── tsconfig.json
The index.ts provides an entry point to the generator. The file contains a function that is called to perform manipulations on a tree that represents the file system.
The schema.json provides a description of the generator, available options, validation information, and default values.
The initial generator function creates a library.
1import { Tree, formatFiles, installPackagesTask } from '@nrwl/devkit';
2import { libraryGenerator } from '@nrwl/workspace';
3
4export default async function (tree: Tree, schema: any) {
5  await libraryGenerator(tree, { name: schema.name });
6  await formatFiles(tree);
7  return () => {
8    installPackagesTask(tree);
9  };
10}
To invoke other generators, import the entry point function and run it against the tree tree. async/await can be used to make code with Promises read like procedural code. The generator function may return a callback function that is executed after changes to the file system have been applied.
In the schema.json file for your generator, the name is provided as a default option. The cli property is set to nx to signal that this is a generator that uses @nrwl/devkit and not @angular-devkit.
1{
2  "cli": "nx",
3  "id": "test",
4  "type": "object",
5  "properties": {
6    "name": {
7      "type": "string",
8      "description": "Library name",
9      "$default": {
10        "$source": "argv",
11        "index": 0
12      }
13    }
14  },
15  "required": ["name"]
16}
The $default object is used to read arguments from the command-line that are passed to the generator. The first argument passed to this schematic is used as the name property.
Running a workspace generator
To run a generator, invoke the nx workspace-generator command with the name of the generator.
1nx workspace-generator my-generator mylibRunning a workspace schematic created with @angular-devkit
Generators that are created using the @angular-devkit are called schematics. Workspace schematics that have been created with the @angular-devkit will omit the "cli": "nx" property in schema.json. Nx will recognize this and correctly run the schematic using the same command as an @nrwl/devkit generator.
1nx workspace-generator my-schematic mylibThe command is also aliased to the previous workspace-schematic command, so this still works:
1nx workspace-schematic my-schematic mylibCreating custom rules with @angular-devkit
Generators provide an API for managing files within your workspace. You can use schematics to do things such as create, update, move, and delete files. Files with static or dynamic content can also be created.
The schematic below shows you how to generate a library, and then scaffold out additional files with the newly created library.
First, you define a folder to store your static or dynamic templates used to generated files. This is commonly done in a files folder.
happynrwl/
├── apps/
├── libs/
├── tools/
│   ├── schematics
│   |   └── my-schematic/
│   |   |    └── files
│   |   |        └── NOTES.md
│   |   |    ├── index.ts
│   |   |    └── schema.json
├── nx.json
├── package.json
└── tsconfig.json
Next, update the index.ts file for the schematic, and create different rules for generating a library, and generating the new files. Both rules have access to the available options provided for the schematic.
1import {
2  apply,
3  chain,
4  mergeWith,
5  move,
6  Rule,
7  SchematicContext,
8  Tree,
9  url,
10  externalSchematic,
11} from '@angular-devkit/schematics';
12import { getProjectConfig } from '@nrwl/workspace';
13
14function generateLibrary(schema: any): Rule {
15  return externalSchematic('@nrwl/workspace', 'lib', {
16    name: schema.name,
17  });
18}
19
20function generateFiles(schema: any): Rule {
21  return (tree: Tree, context: SchematicContext) => {
22    context.logger.info('adding NOTES.md to lib');
23
24    const templateSource = apply(url('./files'), [
25      move(getProjectConfig(tree, schema.name).root),
26    ]);
27
28    return chain([mergeWith(templateSource)])(tree, context);
29  };
30}
31
32export default function (schema: any): Rule {
33  return (tree: Tree, context: SchematicContext) => {
34    return chain([generateLibrary(schema), generateFiles(schema)])(
35      tree,
36      context
37    );
38  };
39}
The exported function calls the two rules, first creating the library, then creating the additional files in the new library's folder.
Next, run the schematic:
Use the
-dor--dry-runflag to see your changes without applying them.
1nx workspace-generator my-schematic mylibThe following information will be displayed.
1>  NX  Executing your local schematic: my-schematic
2
3CREATE libs/mylib/tslint.json (48 bytes)
4CREATE libs/mylib/README.md (164 bytes)
5CREATE libs/mylib/tsconfig.json (123 bytes)
6CREATE libs/mylib/tsconfig.lib.json (172 bytes)
7CREATE libs/mylib/src/index.ts (29 bytes)
8CREATE libs/mylib/src/lib/mylib.ts (0 bytes)
9CREATE libs/mylib/tsconfig.spec.json (273 bytes)
10CREATE libs/mylib/jest.config.js (234 bytes)
11CREATE libs/mylib/NOTES.md (15 bytes)
12UPDATE tsconfig.json (582 bytes)
13UPDATE angular.json (4751 bytes)
14UPDATE nx.json (438 bytes)
15UPDATE package.json (1959 bytes)
Customizing generator options
Adding a TypeScript schema
To create a TypeScript schema to use in your generator function, define a TypeScript file next to your schema.json named schema.ts. Inside the schema.ts, define an interface to match the properties in your schema.json file, and whether they are required.
1export interface SchematicOptions {
2  name: string;
3  type?: string;
4}
Import the TypeScript schema into your generator file and replace the any in your generator function with the interface.
1import { Tree, formatFiles, installPackagesTask } from '@nrwl/devkit';
2import { libraryGenerator } from '@nrwl/workspace';
3
4export default async function (tree: Tree, schema: SchematicOptions) {
5  await libraryGenerator(tree, { name: `${schema.name}-${schema.type || ''}` });
6  await formatFiles(tree);
7  return () => {
8    installPackagesTask(tree);
9  };
10}
Adding static options
Static options for a generator don't prompt the user for input. To add a static option, define a key in the schema.json file with the option name, and define an object with its type, description, and optional default value.
1{
2  "$schema": "http://json-schema.org/schema",
3  "id": "my-generator",
4  "type": "object",
5  "properties": {
6    "name": {
7      "type": "string",
8      "description": "Library name",
9      "$default": {
10        "$source": "argv",
11        "index": 0
12      }
13    },
14    "type": {
15      "type": "string",
16      "description": "Provide the library type, such as 'data-access' or 'state'"
17    }
18  },
19  "required": ["name"]
20}
If you run the generator without providing a value for the type, it is not included in the generated name of the library.
Adding dynamic prompts
Dynamic options can prompt the user to select from a list of options. To define a prompt, add an x-prompt property to the option object, set the type to list, and define an items array for the choices.
1{
2  "$schema": "http://json-schema.org/schema",
3  "id": "my-generator",
4  "type": "object",
5  "properties": {
6    "name": {
7      "type": "string",
8      "description": "Library name",
9      "$default": {
10        "$source": "argv",
11        "index": 0
12      }
13    },
14    "type": {
15      "type": "string",
16      "description": "Provide the library type",
17      "x-prompt": {
18        "message": "Which type of library would you like to generate?",
19        "type": "list",
20        "items": [
21          {
22            "value": "data-access",
23            "label": "Data Access"
24          },
25          {
26            "value": "feature",
27            "label": "Feature"
28          },
29          {
30            "value": "state",
31            "label": "State Management"
32          }
33        ]
34      }
35    }
36  },
37  "required": ["name"]
38}
Running the generator without providing a value for the type will prompt the user to make a selection.
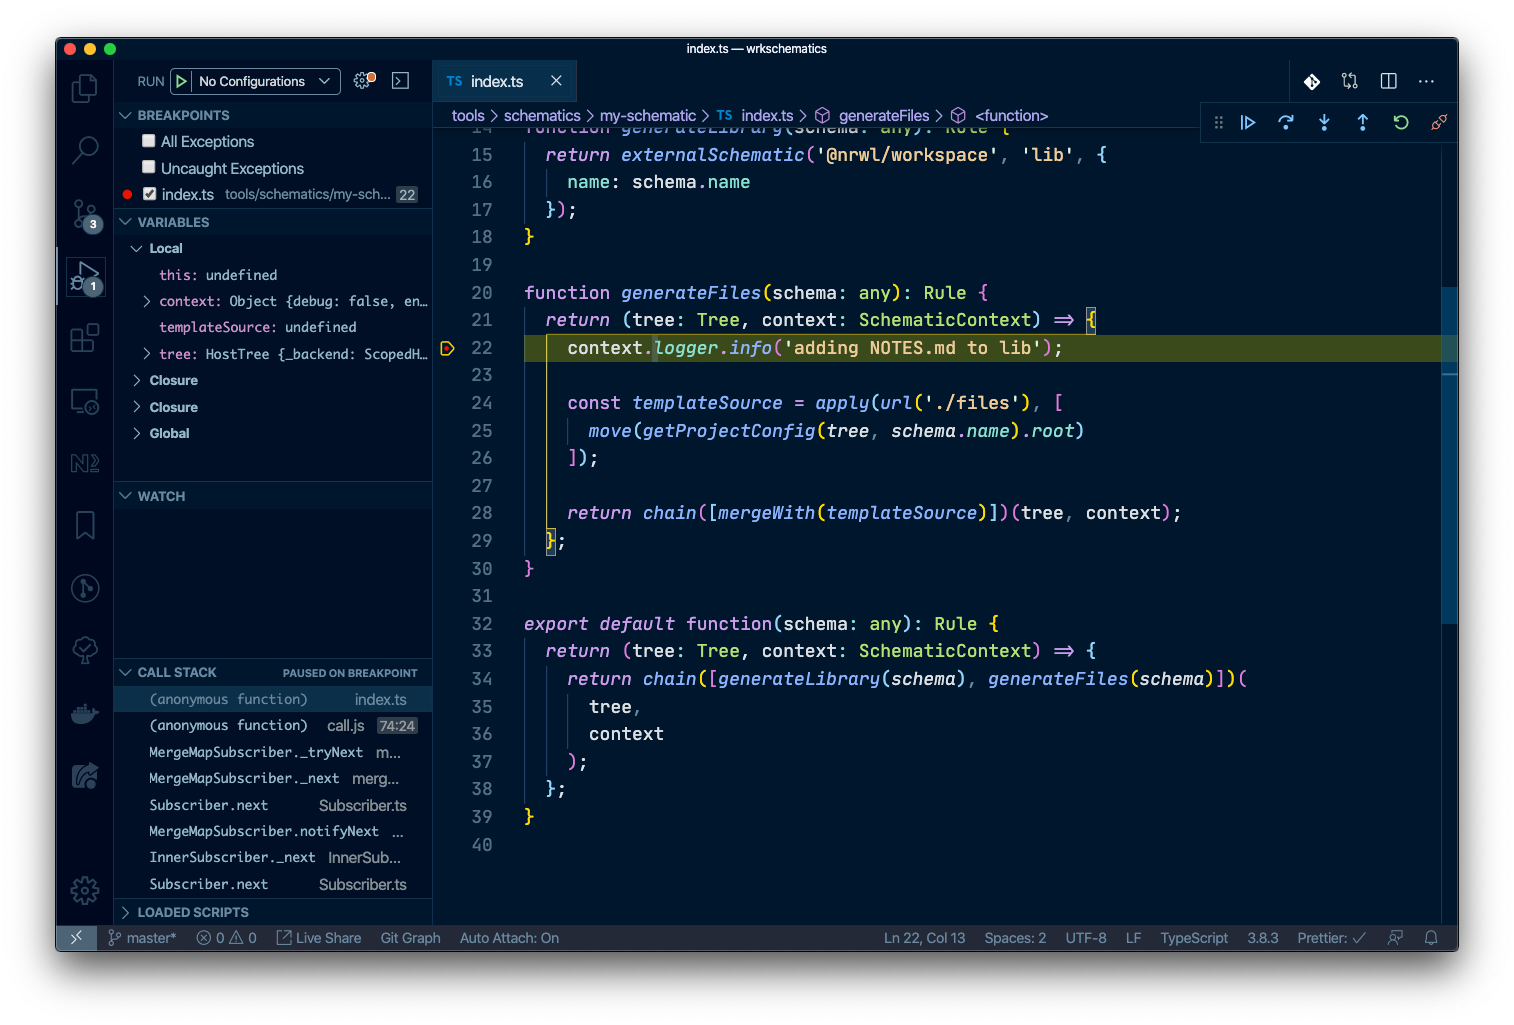
Debugging Workspace generators
With Visual Studio Code
- Open the Command Pallette and choose
Debug: Create JavaScript Debug Terminal. This will open a terminal with debugging enabled. - Set breakpoints in your code
- Run
nx workspace-generator my-generatorin the debug terminal.
Workspace Generator Utilities
The @nrwl/devkit package provides many utility functions that can be used in schematics to help with modifying files, reading and updating configuration files, and working with an Abstract Syntax Tree (AST).